Content Editor
When the heat of summer rolls around, few things hit the spot quite like a chilled, fruit-laden dessert. Not that you’re always in the mood for ice cream — sometimes, something light and spongy like airy marshmallows can be just what you need.
These agar marshmallows are versatile, fluffy, and bursting with possibilities. Pair them with fruit salads, s’mores, or just enjoy them by themselves for a refreshing treat on a hot day. Trust me, once you’ve made these, you’ll be fluffing up marshmallows like a pro.

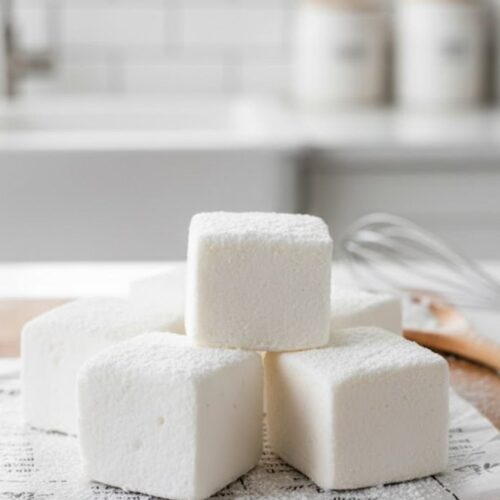
Agar marshmallows are an exciting twist on the classic fluffy treat, beloved for their unique texture and delightful taste. They’re not only easier to make at home than you might think, but they also come with a nutritional upgrade thanks to agar agar, a seaweed-based gelatin that helps create that cloud-like fluff we all crave in marshmallows.
And the best part? They’re vegan! So ditch the gelatin and get ready to whip up some marshmallow magic that everyone can enjoy.
You Might Like These Recipes!
Microwave Pumpkin Custard Recipe
Bionico Mexican Fruit Salad Recipe
Homemade Watermelon Ice Cream Recipe
What is Agar Marshmallow Recipe?
This agar marshmallow recipe uses aquafaba—chickpea brine—as a brilliant egg white substitute, combined with delightful flavors and a touch of sweetness from syrup. It’s simple to prepare and simply impressive when it comes to texture. Instead of the typical gelatin used in homemade marshmallows, the agar agar provides a plant-based gelling agent that maintains that necessary fluffiness while keeping everything vegan-friendly.
Ingredients You’ll Need To Make This Dish

Here’s what you’ll need for making these airy delights:
– For Dusting The Pan:
– ½ cup powdered sugar (2 oz/60 grams)
– ½ cup cornstarch (1.75 oz/50 grams)
– For the Marshmallows:
– ½ cup aquafaba (118 grams, chilled, preferably no salt added)
– ¼ teaspoon cream of tartar (1 gram)
– 2 teaspoons vanilla extract (8 grams)
– 4 teaspoons agar agar powder (10 grams)
– ¼ cup granulated sugar (50 grams)
– 1 cup granulated sugar (7 oz/200 grams)
– ⅓ cup water (80 grams)
– ¾ cup water (180 grams)
– New Ingredient: 2 tablespoons lemon juice (30 grams) – for a bright flavor.
– New Ingredient: ½ teaspoon almond extract (2 grams) – for a touch of warmth.
Ingredients From : jessicainthekitchen.com
How to Make This Agar Marshmallow Recipe?
Now that you’re all set with ingredients, let’s get started! Here’s a step-by-step approach to those wonderfully fluffy marshmallows. Follow along, and before you know it, you’ll be popping these treats into your mouth.
Step-by-Step Directions
Step 1: Prepare the Pan

To start, grab a 9-inch pan. Line it with parchment paper and generously dust it with the combined mixture of powdered sugar and cornstarch. Don’t skimp here; this will prevent those fluffy marshmallows from sticking, making your life a whole lot easier later. Set this aside for a moment.
Step 2: Whip the Aquafaba

In the bowl of your stand mixer, combine the chilled aquafaba and cream of tartar. Start whisking at medium speed until you form soft peaks—this might take around 10 minutes or so. If you’re using aquafaba that isn’t chilled, might want to up the speed to medium-high. The goal here is to get that lovely, fluffy consistency that will envelop all the good stuff you’re about to add.
Step 3: Create Sugar Syrup

Now, let’s move on to the sweet stuff. In a saucepan, combine 1 cup of granulated sugar and ⅓ cup water. Place it over medium-high heat and allow this mixture to come to a simmer without stirring. Be patient! Use a candy thermometer; you’re aiming for about 240°F (115°C) — this usually takes about 10 minutes.
Step 4: Combine Syrup and Aquafaba

Once your syrup reaches that magical temperature, slowly drizzle it into the whipped aquafaba while whisking continuously. Keep whisking away for another 5 to 8 minutes. You’re looking for that glossy, stiff peak texture, so don’t skimp on the work. Oh, and don’t forget to add in that vanilla and almond extract while you’re whisking!
Step 5: Prepare the Agar Mixture

In another saucepan, mix ¼ cup of granulated sugar, ¾ cup water, and agar agar powder. Stir well and place it on medium-high heat. Bring this mix to a boil and whisk it constantly for about 2 to 3 minutes as it simmers. This step is important for activating the agar so that it can do its job properly.
Step 6: Combine Agar and Aquafaba

After cooking the agar mix, slowly pour it into the whipped aquafaba while whisking constantly. The agar should blend seamlessly into the fluff; this shouldn’t take more than a minute. If your arm gets tired, partner up and take turns whisking!
Step 7: Transfer and Set
Now, using a spatula, transfer the marshmallow mixture into your prepared pan. Don’t worry about getting every last bit out; aim for about 90% to keep it elegant and smooth. If you’re having trouble spreading it evenly, dampen your hands or spatula slightly to help. Once it’s in the pan, loosely cover it with a towel. Let the marshmallow set at room temperature for about 4 to 6 hours, or until firm.
Step 8: Cut and Dust
When your marshmallow has set and is firm to the touch, it’s time for the fun part. Dust the top with the remaining sugar and cornstarch mixture. With a dinner knife, gently loosen the edges, then dust a sharp knife with your cornstarch-sugar mix to prevent sticking. Cut your marshmallows into desired shapes—36 square pieces is a good standard. If you like, you can roll each piece in the dusting mixture to coat all sides. Voilà, enjoy!
Tips & Tricks
– Chill your aquafaba: Chilled aquafaba whips up better and faster.
– Use a candy thermometer: Precision matters when making sugar syrups.
– Experiment with flavors: Try different extracts like coconut or lemon for a twist.
– Watch the temperatures: If the syrup cools too much before it reaches the aquafaba, you might lose that fluffiness!
– Cut with a sharp knife: Dust it in cornstarch and sugar to make cutting easier and reduce stickiness.
How Do You Store The Leftovers?
Store your agar marshmallows in an airtight container to keep them fresh. They can last for about a week at room temperature. Just be sure to check for any signs of moisture; if you see any sweat on them, dab it off and re-dust lightly with your sugar-cornstarch mixture.
What Sides Would Complement?
– Fresh Fruit Salad:Brighten up your meal with chilled berries, melons, and citrus.
– Vegan S’mores:Elevate your dessert game by using these marshmallows in a classic s’more.
– Chocolate Fondue:Add a little decadence by dipping marshmallows in melted chocolate.
– Milkshakes:Pair these delightful treats with a rich vanilla or chocolate milkshake for a dream combo.
– Popsicles:Mix crushed marshmallows into homemade fruit pops for a fun texture.
What Other Substitute Can I Use in Agar Marshmallow Recipe?
– Chia Seeds:For added fiber, mix a tablespoon of chia seeds with water as an alternative to aquafaba.
– Flaxseed Meal:A great binder, combine flaxseed meal with water for a different flavor profile.
– Coconut Milk:Swap aquafaba with full-fat coconut milk for a tropical twist.
– Other Sweeteners:Experiment with maple syrup or agave nectar instead of granulated sugar.
– Rice Syrup:For a different sweetness, try using rice syrup in place of granulated sugar in the syrup phase.
Agar Marshmallow Recipe
Equipment
- saucepan
- Stand mixer
- candy thermometer
- Parchment paper
- cutting board
- sharp knife
Ingredients
- Here’s what you’ll need for making these airy delights:
– For Dusting The Pan:
- – ½ cup powdered sugar 2 oz/60 grams
- – ½ cup cornstarch 1.75 oz/50 grams
– For the Marshmallows:
- – ½ cup aquafaba 118 grams, chilled, preferably no salt added
- – ¼ teaspoon cream of tartar 1 gram
- – 2 teaspoons vanilla extract 8 grams
- – 4 teaspoons agar agar powder 10 grams
- – ¼ cup granulated sugar 50 grams
- – 1 cup granulated sugar 7 oz/200 grams
- – ⅓ cup water 80 grams
- – ¾ cup water 180 grams
- – New Ingredient: 2 tablespoons lemon juice 30 grams – for a bright flavor.
- – New Ingredient: ½ teaspoon almond extract 2 grams – for a touch of warmth.
Instructions
Step 1: Prepare the Pan
- To start, grab a 9-inch pan. Line it with parchment paper and generously dust it with the combined mixture of powdered sugar and cornstarch. Don’t skimp here; this will prevent those fluffy marshmallows from sticking, making your life a whole lot easier later. Set this aside for a moment.
Step 2: Whip the Aquafaba
- In the bowl of your stand mixer, combine the chilled aquafaba and cream of tartar. Start whisking at medium speed until you form soft peaks—this might take around 10 minutes or so. If you’re using aquafaba that isn’t chilled, might want to up the speed to medium-high. The goal here is to get that lovely, fluffy consistency that will envelop all the good stuff you’re about to add.
Step 3: Create Sugar Syrup
- Now, let’s move on to the sweet stuff. In a saucepan, combine 1 cup of granulated sugar and ⅓ cup water. Place it over medium-high heat and allow this mixture to come to a simmer without stirring. Be patient! Use a candy thermometer; you’re aiming for about 240°F (115°C) — this usually takes about 10 minutes.
Step 4: Combine Syrup and Aquafaba
- Once your syrup reaches that magical temperature, slowly drizzle it into the whipped aquafaba while whisking continuously. Keep whisking away for another 5 to 8 minutes. You’re looking for that glossy, stiff peak texture, so don’t skimp on the work. Oh, and don’t forget to add in that vanilla and almond extract while you’re whisking!
Step 5: Prepare the Agar Mixture
- In another saucepan, mix ¼ cup of granulated sugar, ¾ cup water, and agar agar powder. Stir well and place it on medium-high heat. Bring this mix to a boil and whisk it constantly for about 2 to 3 minutes as it simmers. This step is important for activating the agar so that it can do its job properly.
Step 6: Combine Agar and Aquafaba
- After cooking the agar mix, slowly pour it into the whipped aquafaba while whisking constantly. The agar should blend seamlessly into the fluff; this shouldn’t take more than a minute. If your arm gets tired, partner up and take turns whisking!
Step 7: Transfer and Set
- Now, using a spatula, transfer the marshmallow mixture into your prepared pan. Don’t worry about getting every last bit out; aim for about 90% to keep it elegant and smooth. If you’re having trouble spreading it evenly, dampen your hands or spatula slightly to help. Once it’s in the pan, loosely cover it with a towel. Let the marshmallow set at room temperature for about 4 to 6 hours, or until firm.
Step 8: Cut and Dust
- When your marshmallow has set and is firm to the touch, it’s time for the fun part. Dust the top with the remaining sugar and cornstarch mixture. With a dinner knife, gently loosen the edges, then dust a sharp knife with your cornstarch-sugar mix to prevent sticking. Cut your marshmallows into desired shapes—36 square pieces is a good standard. If you like, you can roll each piece in the dusting mixture to coat all sides. Voilà, enjoy!
Notes
Nutrition
FAQs
1. Can I use regular marshmallows instead of making my own?
While you can indeed use store-bought marshmallows, they won’t carry the unique flavor and texture that come from making them at home—especially when you use agar. Besides, making them yourself allows for complete control over the ingredients!
2. What’s the difference between agar agar and gelatin?
Agar agar is derived from seaweed, making it vegan and suitable for plant-based recipes, while gelatins are often animal-derived. Agar sets at a higher temperature and provides a firmer texture.
3. Why did my marshmallows not set?
Common reasons include not whisking the aquafaba enough or the syrup not reaching the right temperature. Make sure everything is at the correct consistency and temperature.
4. Can I color my marshmallows?
Absolutely! Use natural food coloring or fruit purees to add color and flavor—like beet juice for pink or matcha for green.
5. How should I serve these marshmallows?
These delightful treats can be served on their own, with desserts, or even thrown into a hot cocoa for a sweet finish!
Conclusion
Making your very own agar marshmallows not only brings satisfaction but also opens up a world of creative dessert options. With some simple ingredients and a touch of patience, you’ve got a delightful, vegan-friendly treat that can grace any dessert table—or simply stand as a delicious snack all on its own.
So roll up your sleeves, gather your ingredients, and let’s get marshmallow-ing! Enjoy the delightful fluffiness in every bite, and remember—there’s nothing like homemade goodness!