Sharon Brown
When it comes to serving a delightful apple crisp, the possibilities are tantalizing. Picture this: a warm, steaming bowl of apple crisp fresh out of the oven, perfectly complemented by a scoop of vanilla ice cream.
That creaminess mingling with the crispy topping and spiced apples creates a blissful experience for your taste buds. You could also serve it alongside a dollop of fresh whipped cream, adding a touch of lightness to every spoonful.
For a more sophisticated pairing, consider a drizzle of caramel sauce or a sprinkle of toasted nuts on top. If you want to turn things up a notch, why not try a side of warm spiced cider? The flavors will harmonize beautifully. Whether you’re hosting a dinner party or enjoying a cozy evening at home, pairing your apple crisp with these accompaniments will elevate your dessert game.

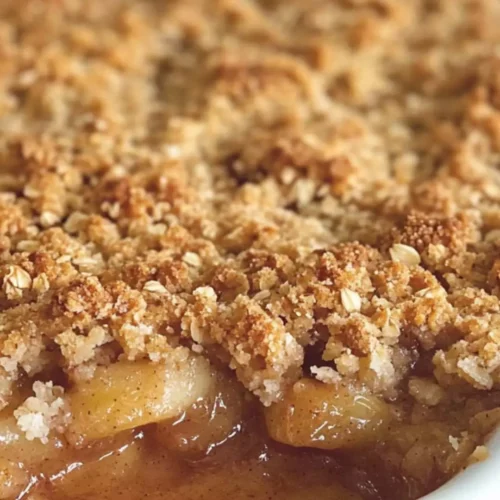
There’s something about apple crisp that feels like home. The scent of cinnamon wafting through the kitchen, the golden-brown sugar topping glistening, and the warm, tender apples underneath all make for an irresistible combination. When I first stumbled upon the Barefoot Contessa’s apple crisp recipe, I knew I was onto something special. Ina Garten, known as the Barefoot Contessa, captures that nostalgic essence in her cooking. Her recipes are not just about feeding; they’re about feeding the soul. Let’s dive into this delicious adventure together.
What is Barefoot Contessa Apple Crisp?
The Barefoot Contessa apple crisp recipe is a classic dessert that highlights the natural flavors of apples with a simple yet delectable crumble topping. The recipe calls for fresh apples tossed in a sprinkle of sugar and spices, then topped with a buttery, oat-filled mixture. Baked until bubbly and golden, it’s comfort food at its finest.
What sets this apple crisp apart is the attention to detail in flavor. The use of different spices like cinnamon, nutmeg, and allspice adds layers of warmth. And the zesty kick from the fresh orange and lemon juice is a delightful surprise that brightens the overall taste.
What is the Flavor Profile of This Dish?
The flavor profile of the Barefoot Contessa apple crisp is a cheerful blend of sweetness and warmth. The apples bring a tartness that balances well with the sugar. The cinnamon adds a cozy spiciness, while nutmeg lends a fragrant depth. The bright notes from the citrus zest imbue the dish with an unexpected freshness.
The topping is equally enticing. With a buttery, crunchy texture from the oats and flour, it brings the necessary contrast to the tender apples. When baked to perfection, it achieves a delightful crisp without becoming overly crunchy. It’s a symphony of textures and tastes!
Why You’ll Love This?
You’ll adore this apple crisp for its ease of preparation. Seriously, if you can slice an apple, you can make this dish. It’s perfect for gatherings or a simple evening treat. Plus, the recipe yields enough to share—or to keep all to yourself.
Another reason to love this recipe is its versatility. It’s wonderful as a dessert but can easily star at breakfast or brunch. Serve it warm with yogurt, and you’ve got a delightful start to your day. Not to mention, it fills your kitchen with an incredible aroma that will make anyone wandering by stop in their tracks.
Ready to bring some magic into your kitchen? Let’s get into the details.
Ingredients

Filling:
- 5 pounds of McIntosh or Macoun apples
- 2 tablespoons of freshly squeezed orange juice
- 2 tablespoons of freshly squeezed lemon juice
- Zest of 1 orange
- Zest of 1 lemon
- 1/2 cup of white granulated sugar
- 2 teaspoons of ground cinnamon
- 1 tablespoon of cornstarch
- 1 teaspoon of ground nutmeg
- 1/4 teaspoon of ground allspice
Topping:
- 1/2 pound of cold unsalted butter, cut into small cubes
- 1-1/2 cups of all-purpose flour
- 1 cup of old-fashioned oats
- 3/4 cup of packed light brown sugar
- 3/4 cup of white granulated sugar
- 1/2 teaspoon of sea salt

Step by Step Instructions
Step 1: Preheat Oven and Prepare Cupcake Tray
First, preheat your oven to 350°F (175°C).
Prepare a standard 12-cup cupcake tray by greasing each cup lightly with butter or spraying with non-stick baking spray.
This will prevent sticking and help your mini crisps come out beautifully golden brown.
Step 2: Prepare the Apples

Peel and slice the apples into small chunks (instead of wedges, since it’s mini-sized).
Place them in a large mixing bowl and sprinkle with lemon juice and orange juice to prevent browning.
Add sugar, cinnamon, nutmeg, allspice, cornstarch, and the zests.
Gently toss until all the apple pieces are evenly coated with the spice mix.
Step 3: Assemble the Filling

Spoon the apple mixture evenly into each cupcake cup.
Fill each cup about two-thirds full, gently pressing down to compact the apples slightly.
This will make sure they bake evenly and stay juicy without overflowing.
Step 4: Create the Topping
In a separate bowl, mix together the flour, oats, brown sugar, granulated sugar, and sea salt.
Add cold butter cubes and use your fingers or a pastry cutter to work it in.
You want the mixture to be crumbly with small butter bits throughout — this creates a crunchy topping.
Step 5: Assemble and Bake

Sprinkle the crumb topping generously over each apple-filled cupcake slot, covering all the apples.
Place the cupcake tray into the preheated oven and bake for about 25 to 30 minutes,
or until the tops are golden brown and the apple filling is bubbling slightly.
Step 6: Cool and Serve

Remove the tray from the oven and let the mini apple crisps cool in the tray for about 10 minutes.
Then carefully run a knife around the edges and lift them out.
Serve warm — perfect with a scoop of vanilla ice cream or a drizzle of caramel sauce!
Tips & Tricks
Here are my top five tips to ensure your Barefoot Contessa apple crisp is as fabulous as it can be:
- Choose Your Apples Wisely: Use a mix of sweet and tart apples for depth of flavor. My favorites are McIntosh and Granny Smith. They yield the best texture and flavor.
- Experiment with Add-ins: Consider adding dried cranberries, raisins, or walnuts into the apple mixture for some extra flair. They complement the flavors beautifully.
- Control the Sweetness: Adjust sugar levels based on the sweetness of your apples. If they are particularly sweet, you might want to reduce the sugar.
- Make Ahead: You can prepare the filling and topping separately and store them in the fridge until you’re ready to bake. Just allow them both to come to room temperature before combining and baking.
- Try Different Spices: Don’t be afraid to play around with spices. Adding ginger or cardamom can create a nice twist to the usual flavor profile!

Nutrition Information
barefoot contessa apple crisp recipe nutrition facts

How Can You Store This Barefoot Contessa Apple Crisp?
Storing your delicious apple crisp is quite simple. Once it has cooled, cover it tightly with plastic wrap or aluminum foil. It’s best stored in the refrigerator, where it should stay fresh for up to four days. When you’re ready to enjoy it again, simply reheat individual portions in the microwave or pop it back in the oven at 350°F until warmed through.
What if Some Ingredients are Not Available?
Not everyone has a full pantry or specific item on hand. Here are alternative choices you can consider:
- Apples: If McIntosh or Macoun apples are not available, Granny Smith or Fuji apples work well too. They still give a great balance of tartness and sweetness.
- Cornstarch: In case you have run out of cornstarch, you can use all-purpose flour as a thickening agent instead, though this might slightly alter the crisp texture.
- Butter: If you’re looking for a non-dairy option, coconut oil or vegan butter can be used in place of regular butter. It will change the flavor slightly but offers a nice twist.
Barefoot Contessa Apple Crisp Recipe
Equipment
- Oven
- 3-quart baking dish
Ingredients
- 5 pounds McIntosh or Macoun apples
- 2 tablespoons freshly squeezed orange juice
- 2 tablespoons freshly squeezed lemon juice
- Zest of 1 orange
- Zest of 1 lemon
- 1/2 cup white granulated sugar
- 2 teaspoons ground cinnamon
- 1 tablespoon cornstarch
- 1 teaspoon ground nutmeg
- 1/4 teaspoon ground allspice
- 1/2 pound cold unsalted butter cut into small cubes
- 1-1/2 cups all-purpose flour
- 1 cup old-fashioned oats
- 3/4 cup packed light brown sugar
- 3/4 cup white granulated sugar
- 1/2 teaspoon sea salt
Instructions
- First, preheat your oven to 350°F (175°C). Prepare a 3-quart baking dish by greasing it lightly with butter. This step ensures that the crisp will not stick to the dish and will give it a beautiful, golden brown finish.
- Next, peel and slice the apples into wedges or chunks, depending on your preference. Placing them in a large mixing bowl, sprinkle with lemon juice and orange juice immediately to keep them from browning. Add the sugar, spices (cinnamon, nutmeg, allspice), cornstarch, and zests. Gently toss to coat the apples evenly in the mixture, ensuring every piece gets a taste of the delightful spices.
- Transfer the apple mixture into the prepared baking dish, spreading them out evenly. This layer of apples will provide the base for your crisp and will caramelize beautifully during baking, enhancing the flavors with each passing minute.
- In another mixing bowl, combine the flour, oats, both sugars, and sea salt. Mix them until well combined. Now, here’s the fun part! Add in the cold butter cubes. Using your fingers or a pastry cutter, work the butter into the dry mixture. Aim for a crumbly texture where the butter is evenly distributed. This will create that sought-after crunchy topping.
- Sprinkle the topping generously over the apples, ensuring that every inch of filling is covered. Now it’s time for the oven! Bake for about 45 to 55 minutes or until the apples are bubbling and the topping is golden brown.
- Once baked, remove the dish from the oven and let it cool for about 10 to 15 minutes. This resting period is essential. It allows the filling to set slightly, making serving easier. Scoop it warm into bowls and enjoy!
Notes
- Choose Your Apples Wisely: Use a mix of sweet and tart apples for depth of flavor. My favorites are McIntosh and Granny Smith. They yield the best texture and flavor.
- Experiment with Add-ins: Consider adding dried cranberries, raisins, or walnuts into the apple mixture for some extra flair. They complement the flavors beautifully.
- Control the Sweetness: Adjust sugar levels based on the sweetness of your apples. If they are particularly sweet, you might want to reduce the sugar.
- Make Ahead: You can prepare the filling and topping separately and store them in the fridge until you’re ready to bake. Just allow them both to come to room temperature before combining and baking.
- Try Different Spices: Don’t be afraid to play around with spices. Adding ginger or cardamom can create a nice twist to the usual flavor profile!
Nutrition
Frequently Asked Questions
Conclusion
The Barefoot Contessa apple crisp recipe is more than just a dish — it’s an experience. From the moment you begin slicing apples to the glorious waft of spiced goodness enveloping your kitchen, each step is filled with joy and anticipation. Whether enjoyed solo or shared with loved ones, this timeless dessert never fails to impress.
So, roll up your sleeves, gather your ingredients, and let the baking magic unfold. You might just discover a new family favorite that stands the test of time. Happy baking!