Content Editor
Ah, fall! It’s the season of cozy evenings, warm sweaters, and, of course, delectable desserts. When the leaves turn crisp and the air fills with the earthy scent of autumn, nothing feels quite right without a slice of pear tart.
But not just any tart—a Boots-on-the-Ground kind of tart, inspired by Ina Garten, the Barefoot Contessa herself. As I dive into this delightful recipe, let’s explore what to pair with this dish first.

You’ll Also Like These Recipes
- Grilled Pineapple Barbecue Chicken Recipe
- Easy Ground Turkey Pasta
- Roasted Chicken and Potatoes with Broccoli
What Pairs Well with Pear Tart?
First things first, let’s talk pairings! A pear tart shines when complemented with the right accompaniments. Picture this: you’ve just taken a bite of that warm, buttery pastry. What would elevate that experience?
- Vanilla Ice Cream: When I think of warm desserts, I always envision a scoop of smooth, rich vanilla ice cream. The creaminess contrasts beautifully with the tart, balancing the sweetness of the pears.
- Spiced Whipped Cream: A dollop of whipped cream with a hint of cinnamon can bring warmth to your dish. It adds a touch of richness that makes each bite extraordinary.
- Cheese: A sharp blue cheese or creamy mascarpone can be an unexpected yet perfect pairing. The saltiness of cheese against the sweet, tender pears creates a symphony of flavors—gourmet dining at home!
A Sweet Introduction to Pear Tart
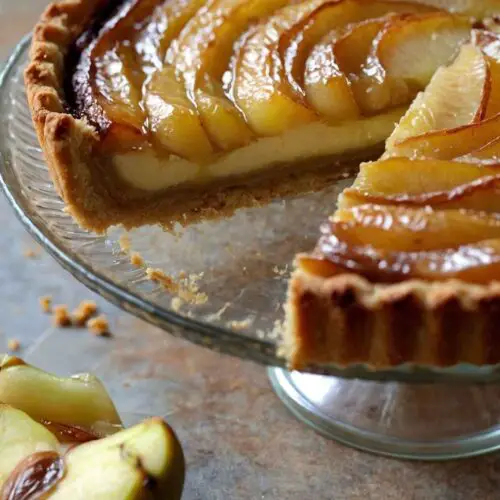
Let’s shift gears and jump into the world of the Barefoot Contessa pear tart. This delightful dessert, with its flaky crust and tender fruit filling, brings everything I love about baking into one dish. But why did I choose this particular recipe?
For starters, it’s incredibly easy! As a busy person who strives to eat healthy while indulging once in a while, this tart ticks all the boxes.
What is the Barefoot Contessa Pear Tart?
The Barefoot Contessa pear tart is a classic French dessert made with a buttery crust and a luscious filling of thinly sliced pears.
Rooted in the spirit of homemade goodness, it brings nostalgia with every bite. The tart showcases the simplicity of fresh ingredients turned into something extraordinary.
Why This Recipe Works?
Here’s why this recipe stands out:
- Simplicity at Its Best: What I love about the Barefoot Contessa approach is its focus on straightforward methods. You don’t need to be a pastry chef to whip this up. Just follow the steps, and you’ll impress friends and family.
- Deliciously Balanced Flavor: The combination of sweet pears with a hint of vanilla and the buttery crust makes for a perfect taste. Each ingredient highlights the others, creating a unified flavor profile.
- Seasonal Ingredients: This tart celebrates fresh pears. Using seasonal fruits not only enhances the flavor but also supports sustainable eating practices.
- Flexible and Adaptable: Want to switch things up? Go for it! Use whatever fruits are in season or even add spices for warmth. This recipe can adapt to your taste.
Ingredients You’ll Need to Make This Dish
Before we roll up our sleeves, here’s what you need to gather:
- For the crust:
- 1 ½ cups all-purpose flour
- ½ cup unsalted butter, chilled and diced
- ¼ cup granulated sugar
- 1 egg yolk
- 2 to 3 tablespoons ice water
- For the filling:
- 3 to 4 ripe pears, peeled and thinly sliced
- 1 tablespoon lemon juice
- ½ teaspoon vanilla extract
- 2 tablespoons granulated sugar
- 1 tablespoon cornstarch

How to Make the Barefoot Contessa Pear Tart?
Step 1: Prepare the Crust
Start by making the crust. Combine the flour, sugar, and petals of butter in a bowl. Use a pastry cutter or your fingertips to mix until the mixture resembles coarse crumbs. Next, add the egg yolk and ice water. Mix gently until a dough forms, then shape it into a disc and refrigerate for at least 30 minutes.
Step 2: Preheat the Oven
While the dough chills, preheat your oven to 375°F (190°C). This way, you’ll have it ready to go once your dough is set.
Step 3: Roll Out the Dough
Once your dough is chilled, roll it out on a lightly floured surface until it’s about 1/8 inch thick. Carefully transfer it to a tart pan, pressing it into the corners. Trim excess dough hanging over the edges.
Step 4: Prepare the Filling
In a large bowl, toss the sliced pears with lemon juice, vanilla, sugar, and cornstarch. The cornstarch will help thicken any juices released during baking. Make sure each piece is coated well.
Step 5: Assemble the Tart
Spoon the pear mixture into the prepared crust, arranging the slices neatly. This is where you get to be an artist! Make it look beautiful; it’s part of the fun.
Step 6: Bake
Bake in the preheated oven for about 35-40 minutes or until the pears are tender and the crust is golden brown. The aroma wafting through your kitchen? That’s the subtle sign of deliciousness.
Step 7: Cool and Serve
Once baked, allow your tart to cool for a bit before slicing. Serve warm or at room temperature, with your favorite complements like ice cream or whipped cream.
Tips & Tricks
To make your pear tart even more delightful, here are some handy tips:
- Choose Ripe Pears: Ripe pears provide the best flavor. Look for pears that yield slightly to pressure.
- Cool Completely: Allow the tart to cool before slicing. This helps set the filling and keeps things neat.
- Experiment with Spices: Cinnamon or nutmeg can add depth to your filling. Add a pinch to personalize it!
- Make Ahead: This tart can be prepared a day in advance. Just reheat slightly before serving for best flavor.
- Store Properly: Keep leftovers in an airtight container in the fridge for up to three days.
Nutrition Information
Per serving (assuming 8 slices):
- Calories: Approximately 210
- Total Fat: 9g
- Saturated Fat: 5g
- Carbohydrates: 30g
- Fiber: 2g
- Protein: 2g
- Sugar: 10g
How Do You Store the Leftovers?
To store your leftover Barefoot Contessa pear tart, place it in an airtight container. It’ll keep well in the fridge for about three to four days.
You can also wrap it tightly in plastic wrap and freeze it for up to a month. Just make sure to thaw it in the fridge overnight before enjoying.
What Sides Would Complement Barefoot Contessa Pear Tart?
Looking to enhance your meal? Here are some delightful side options:
- Mixed Green Salad: A light salad with a simple vinaigrette can balance the sweetness of the tart. Fresh greens, like arugula and spinach, topped with cherry tomatoes, will provide a delightful contrast.
- Cheese Platter: Pair your tart with a selection of cheeses. A variety of textures and flavors—from creamy brie to sharp cheddar—can make your dessert experience more refined.
- Charcuterie Board: A beautifully arranged charcuterie board with meats, cheeses, and fruits can impress guests. It adds a savory touch before indulging in the sweetness of the tart.

What Alternatives Can You Use for the Ingredients?
Don’t have everything? Here are some substitutes:
- Butter: If you’re out of butter, coconut oil can be a decent replacement. It has its own distinct flavor but will work well in the crust.
- Sugar: You can use honey or maple syrup as a natural sweetener in place of sugar. Adjust to taste, as these are sweeter than granulated sugar.
- Pears: Not a pear person? Apples or peaches can work beautifully as alternatives. Just make sure to adjust cooking times based on the fruit you choose.
- Cornstarch: In a pinch? You can use all-purpose flour instead. The texture will change slightly, but it will still thicken the juices.
Barefoot Contessa Pear Tart Recipe
Equipment
- Oven
Ingredients
Crust
- 12 tablespoons unsalted butter melted
- 1 ½ cups all-purpose flour
- 5 tablespoons granulated sugar
- ½ teaspoon sea salt
Filling
- 8 large ripe pears washed
- ¾ cup fig preserves
- 3 tablespoons unsalted butter
- 1 tablespoon water
- ¼ teaspoon fine salt
- ½ teaspoon ground cinnamon adds warmth and depth
- 1 teaspoon lemon zest enhances the fruit’s brightness
Instructions
Step 1: Prepare the Crust
- Start by making the crust. Combine the flour, sugar, and petals of butter in a bowl. Use a pastry cutter or your fingertips to mix until the mixture resembles coarse crumbs. Next, add the egg yolk and ice water. Mix gently until a dough forms, then shape it into a disc and refrigerate for at least 30 minutes.
Step 2: Preheat the Oven
- While the dough chills, preheat your oven to 375°F (190°C). This way, you’ll have it ready to go once your dough is set.
Step 3: Roll Out the Dough
- Once your dough is chilled, roll it out on a lightly floured surface until it’s about 1/8 inch thick. Carefully transfer it to a tart pan, pressing it into the corners. Trim excess dough hanging over the edges.
Step 4: Prepare the Filling
- In a large bowl, toss the sliced pears with lemon juice, vanilla, sugar, and cornstarch. The cornstarch will help thicken any juices released during baking. Make sure each piece is coated well.
Step 5: Assemble the Tart
- Spoon the pear mixture into the prepared crust, arranging the slices neatly. This is where you get to be an artist! Make it look beautiful; it’s part of the fun.
Step 6: Bake
- Bake in the preheated oven for about 35-40 minutes or until the pears are tender and the crust is golden brown. The aroma wafting through your kitchen? That’s the subtle sign of deliciousness.
Step 7: Cool and Serve
- Once baked, allow your tart to cool for a bit before slicing. Serve warm or at room temperature, with your favorite complements like ice cream or whipped cream.
Notes
- Choose Ripe Pears: Ripe pears provide the best flavor. Look for pears that yield slightly to pressure.
- Cool Completely: Allow the tart to cool before slicing. This helps set the filling and keeps things neat.
- Experiment with Spices: Cinnamon or nutmeg can add depth to your filling. Add a pinch to personalize it!
- Make Ahead: This tart can be prepared a day in advance. Just reheat slightly before serving for best flavor.
- Store Properly: Keep leftovers in an airtight container in the fridge for up to three days.
Nutrition
Frequently Asked Questions
Can I use gluten-free flour for the crust?
Yes! You can substitute regular flour with a gluten-free blend. Ensure it’s meant for baking to achieve the right texture.
What’s the best variety of pears to use?
For this tart, Bosc or Anjou pears are excellent choices. They hold their shape well and have great flavor when baked.
Can I make this tart vegan?
Absolutely! Substitute butter with vegan butter and use a flax egg in place of the egg yolk. It may modify the flavor slightly, but it’ll be delicious.
Is it okay to use canned pears?
Fresh gives the best results, but if you use canned pears, make sure to drain them well. Consider reducing the sugar since canned pears can be syrupy sweet.
Can I add nuts to the filling?
Yes, chopped walnuts or pecans can add great texture and flavor. Just fold them in with the pears before baking.
How can I enhance the flavor profile?
A splash of brandy or bourbon in the filling can add depth. A hint of fresh ginger or citrus zest can also elevate the flavors!
Conclusion
There you have it—your guide to creating a mouth-watering Barefoot Contessa pear tart. This dish offers a wonderful blend of textures and flavors, making it perfect for gatherings or simple family dinners. So, grab your apron, crank up the oven, and treat yourself to this beautiful dessert.
Whether enjoyed with a scoop of ice cream or all on its own, one thing’s for sure: this pear tart is sure to warm your heart and satisfy your sweet tooth. Who knew a simple dessert could deliver such comfort? Happy baking!